In “A Tour of the Linux File System” I went over the basics of the file system structure used in linux (hence the title). In this guide I am going to talk about users, groups and permissions. This guide could be considered an overview and we will go over changing file owners, groups and permissions in another article since it is better to understand something before you try to change it.
Linux is a true multitasking, multiuser system. An example of this would be if you are sitting there logged into your computer, which is on a network, and someone else on your network logged in via programs called telnet or ssh. They would log in using their own user account and would get a command line interface very much like the one you have access to while sitting at your computer with their own home directory and their own set of permissions. It is also possible to set up the X server (the part of linux that makes the graphical user interface) to allow remote logins and the remote users would have a desktop environment… but that is a different guide. Permissions in linux are based on these things: users, groups and everything else.
Users
Every person (and even some programs) who has access to the linux system is considered a user. Every user has their own set of user permissions and actual users will also have their own home directory. The files in a users home directory are owned by that user. By default, a regular linux user cannot access, read or modify another user’s files. All linux files have a user owner and a set of user permissions. The user owner of your files would be you.
Groups
Every user account in linux belongs to a group. Groups are pretty much groups of users. By default your user account is probably in the users group. All files in linux have an owner group as well as a second layer of permissions and that is the group permissions. Lets say you had a file in your home directory that you wanted other users in the users group to be able to read. The way to accomplish this is to set the group permission to read. Once these permissions are set the people in the users group can read (but not modify) the file.
Everyone Else
Files in linux have a third set of permissions. This is the “everyone else” permissions. If you wanted everyone to be able to read a file you would set the “everyone else” permissions to read. When this is set, everyone, regardless of the group they’re in, can read the file.
The Permissions
There are two ways to view a file’s permissions in linux. As with most things you can use the command line method or the GUI method.
Graphical Permissions
To view file permissions in Mepis we will use the Konqueror file browser. Click on KMenu, then click on Home (Personal Files). The file browser will open up to your /home/username directory and show (by default) all of the non-hidden files (hidden files typically just start with a “.”). You should see something like this:
You can click on the image to view a larger version.
In this image (and hopefully in your own file browser window) you will see two panes. The pane on the right shows the files and some of its attributes. If your window doesn’t look like the one in the image then click on View, then click on View Mode and finally Detailed List Mode. The right pane should switch to a similar view. The columns in the file list pane (and what they are) are as follows: Name (the file name), Size (the file size), File Type (the type of file), Modified (the last time the file was modified), Permissions (the files permissions), Owner (the user owner of the file) and Group (the group owner of the file). You will probably notice that the owner of most of the files is your username since these are your personal files. The group owner is probably users since you are (by default) a member of the users group. In the permissions column you will notice a line of text that looks something like this: rw-r–r– or rwx-r-xr–. The permissions are displayed in this way to show each “layer” of permissions. The first three letters is the owner permissions, the second three are group permissions and the third set of three is the “everyone else” permissions. Each set of three works like this: The first letter is read or r, the second letter is write or w and the third letter is execute or x. In the example rwxr-x— the permissions are set as follows: The user owner has read, write and execute permissions (rwx); The group owner has read and execute but not write (r-x); Everyone else has no permissions (—). It isn’t too complicated as long as you can remember the three layers of permissions.
You to view a single files permissions you can right click on a file and click on Properties. This will open up a properties window. Click on the Permissions tab to view the permissions. It will look something like this:
You will see the permission layers Owner, Groups and Others as well as an “is executable” checkbox. You will also see the owner and the group owner shown. Once you have seen enough click Cancel to close this window. We won’t be changing any permissions in this guide. You can also close the file browser window by clicking Location and then clicking Quit. Now we can move on to the…
Command Line Permissions
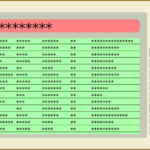
First if you don’t already have a terminal window open click on KMenu, then click System and finally click Konsole (Terminal Program). This will open up the Konsole terminal emulator and by default your working directory will be your /home/username directory. Type in ls -l and hit enter. It will list all of the non-hidden files in your home directory with details (much like “Detailed List View” in the GUI method) and should look something like this:
-rw-r--r--   1 nugod users   2984892 2005-08-09 22:21 themes.tar.gz
drwxr-xr-x   3 nugod users      4096 2005-07-26 00:05 torrents
-rw-------   1 nugod users     15985 2005-07-30 15:55 TPSreport.pdf
drwxr-xr-x   2 nugod users      4096 2005-08-12 03:11 wallpapers
drwx------   2 nugod users      4096 2005-08-01 00:06 xchatdownloads
drwxr-xr-x   4 nugod users      4096 2005-08-08 01:23 Xlack-2.1
-rw-r--r--   1 nugod users    303484 2005-08-08 01:21 xlack-2.1.tar.gz
-rwxr-xr-x   1 nugod users     30589 2005-07-13 00:47 yaLCD
-rwxr-xr-x   1 nugod users        33 2005-07-13 22:19 yaLCD.sh
These “columns” are as follows: permissions, number of links to this file, owner, group, file size, last time the file was modified and finally filename. The only major difference between this mmethod and the graphical method is in the permissions line. You might have already noticed that there is an extra character at the beginning of the permissions. This character will either be a “d” or a “-“. The “d” means that this is a directory and the “-” means that it is a normal file. In the graphical method directories are shown as folders.
Conclusion
Hopefully the way linux users, groups and permissions are setup is a little easier to understand now. As stated earlier this was just an overview to help grasp the whole user/group/permissions idea before changing permissions. In the next permissions guide we will show you how to change permissions in the GUI as well as the command line.

Average Rating